|
GALLERY
GALLERY 2
|
|
|
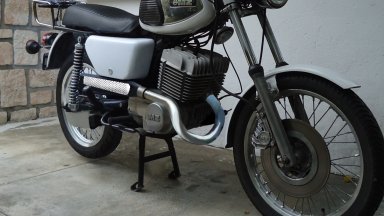
A 250 ETZ. BUT WHY? All this stuff started because a friend of mine, musician, whose the wife I've addressed to give piano lessons to my youngest children who refused continuing to deal with his music school teatcher. So, every Saturday morning, I was used to pick my son up to attend his course, and whilst he was playing his scales on the baby grand piano whith this friend's wife, I was discussing with him. And what was he speaking to me about? About his numerous oldtimer motorbikes including this austere 250 MZ ETZ that he would absolutely like to sale to me, daring to tell me that I was its logical heir, that I was the only that could insure appropriate care and long life to this motorbike. May be even, he told me, one day he was particularly uninhibited, that I was the very man to be capable of removing the motorcycle from its uglyness? Thus, step by step, my subconscius was growing accustomed to buying this quasi monstruosity up to the point, one night, I awaked in thinking that everything was not definitely dead for this motorbike, and that its main dystrophies could get fixed, and that consequently, the beast could show a sort of potential beauty? Myself that was dreaming about to ride a big 2 stroke monocylinder with a 5 speeds gear box since ages, I get trapped. Of course, I would like to find out a trial or enduro OSSA 250, but they are so scarce... And then, finally, the MZ suddenly became a captivating challenge... TO TACKLE THE EVIL STRAIGHT: FIRST OF ALL, THE TOP CYLINDER? The top cylinder was the first abomination to correct, with its horizontal fins, as if the already huge cylinder was continuing still higher to be ended by a flat cap on which a spark plug was planted, as a birthday cake that is pruned with an axe by a drunk lumberjack? As I see it, to remove the top cylinder was like a test, the sine qua non condition to keep this motorbike. Given its back fastening, to find a similar top cylinder on the shelves seemed unrealistic. An other solution consisted in adapting the 250 TS top cylinder but too much work was required given its lateral spark plug and its differently positionned studs. Finally, the only solution was to modify the guenuine top cylinder... After making some calculations from photos, I decided to slice the top cylinder (given that it is a cake) then to make as many cardboard pieces as fins that are available within the off-cuts, in order to assess what it is realistic to make in putting the fins in a normal position on a full size model. I shortly understood that a fan style top cylinder (the most agressive style) required more metal than the available off-cuts. So, I made do with a more classical top cylinder style, with convergent fins toward the spark plug, and I drew the fins positions on the old top cylinder base once it was sliced: 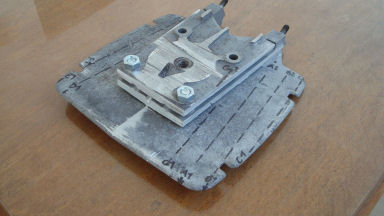
Then, after positionning each fin on the base (hours with a file, and gloves to avoid damaging my skin), I built up step by step a new top cylinder with the off-cuts from the sliced one. A heavy job, the fins are standing up by their own: 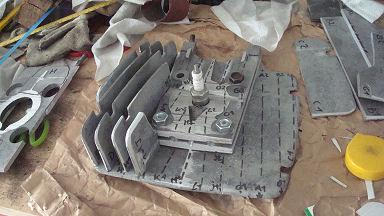
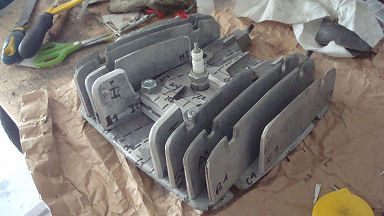
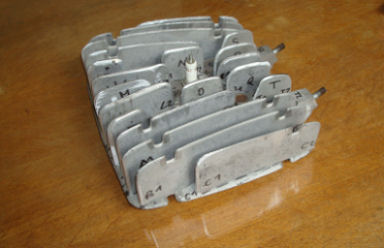
And finally, after a working week (and not a 35H one), the result seemed more and more positive. Consequently, all that stuff ended to an argon welding specialist then to the microbillage. 
TO TACKLE THE SECOND EVIL, THIS ONE NOT VISIBLE BUT SO MUCH DANGEROUS? Once dismantling the monster, although it shouln'd deserve such a term since the top cylinder is visually bearable, it appears that the motorbike maker didn't focus its attention on the frame. The thinness of the tubes that link the backbone low to the top of the shock absorbers makes me frightened. Their bottom fastening is only due to thin ties that was initially articulated then barely weld? As for the frame backbone, it is less than 2 mm thickness metal sheet made and sounds like it was made of cardboard. I've last red some various testimonies but most of them is deploring the 250 ETZ bad roadholding. Discovering such a frame weakness confirmed all the possible fears on this respect? A huge reinforcement work got necessary, a radical one, not to say surgical. After some hypothesis on pencil drawings to try to guess where the constraints and torsion riks are (thanks to Cremona), I decided to hit very hard on the 3 most critical parts, and chose to these following modifications: 
On this picture below, the diameter gap between the guenuine tube (cut) on the right side, and the new reinforced one on the left side is obvious: 
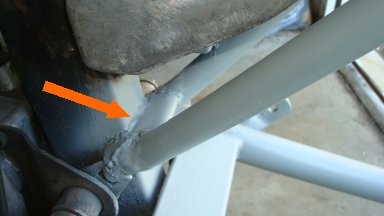
And then, between ourselves, even with a bigger diameter, how tubes could get rigid if they are not fastened on a spud that encloses the backbone low and joints them with it? This part (see above on the right side and below) that surrounds half the 2 tubes and almost half the backbone low seems fundamental to insure the rear frame robustness. 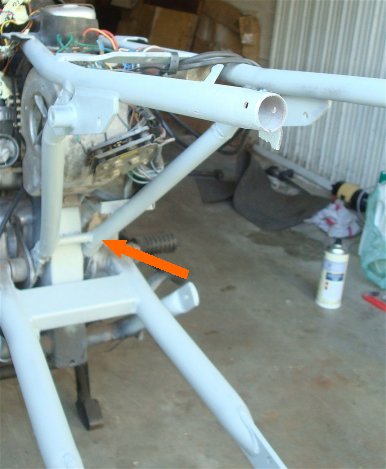
On this photo below, you can see the angle irons and the triangulation added to the backbone. It is not very beautiful, even on black color, but it is partially hidden by the tank. By the way, don't you think the 125 MZ TS tank is gorgeous? So, why not this tank if it is relatively easy to fit it to the ETZ frame thanks to some slight modifications. 
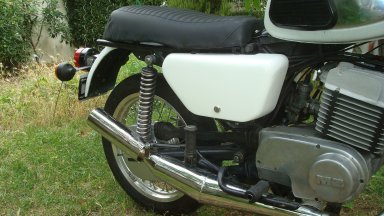
THEN, THE TANK, THE LATERAL HOUSINGS, THE REAR WHEEL AND MUDGUARD: A BIG JOB TO DO! Let me get rid off the guenuine tank-jerrican, so much austere that it scares everyone to ride the beast? May be it has been designed with an axe during the same night as the top cylinder? But since the new tank is mounted, with its subtil curves, the lateral housings (toolkit and intake silencer) show angular shapes that became incongruous. It is now necessary to put the lateral boxes in the same style as the tank, in giving them the same soft and nice curves. To do that requires to mould extensions, and the fatest way to do that is probably to built the cast straight to the genuine boxes. It is not orthodox at all, and the most proficient fiber glass specialists will tell you that it is absolutely not orthodox. But the most pressed people know what they do, especially those that don't have the patience that is required by a batch of operations and chimical products as sticky as stinking: removal wax, casting resin, gel-coat, yuk-yuk? 
After a first draft plaster cast, it requires to compensate with hours of putty, sandpapering, finishing, putty, sandpapering, finishing? But at last, one day, the result get correct. See below the right and left housings while coating. They are not sharp any more, and are more and more fitting the tank style: 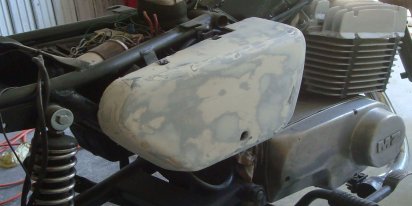
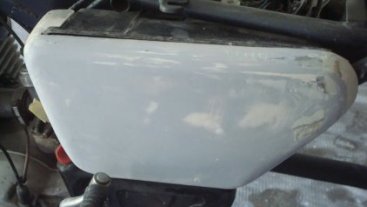
On the picture below, the left side housing has got a good coating level, before the definitive spray painting. Until then, you can see the tank fastening lug added on its rear side, made of fiberglass too (welding the tank requires to fill it with water, that needs courage I didn't have)? 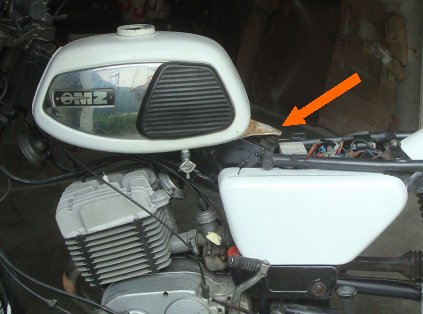
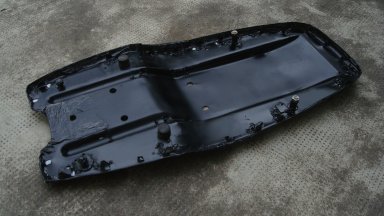
The rear mudguard is so weirdly designed that only its global outline can be kept (narrow and deep, except for on its back side where it becomes wider and almost passable). Whence the decision to cast polyurethane foam inside this odd mudguard, then to widen this base with plaster in order to get a wide muderguard, quasi flat and smooth-brimmed, as the front mudguard, enough pretty well designed to be emphasized? Here below a first rough draft cast made with polyurethane + plaster, and on its right side, the flat part housed under the seat: 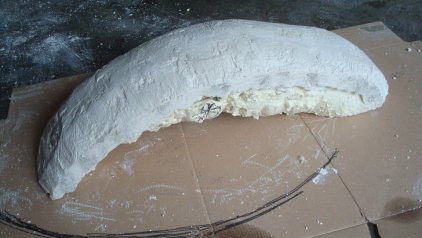
You can glance below the preliminary mudguard under two different angles, drafted but with shape and symetry defaults that are perfectly visible on these 2 photos. A trick: to paint with a different color at every coat enables to know all the unevennesses during the sandpapering, and to control the job at every stage. Then, as Sisyphe, puttying the hollowes and sandpapering with a slightly flexible flat supporting tool in order to follow the curve up to get an outline that gets regular on the touch? Notice that the guenuine rear wheel is not shaping up the back side of the bike due to its narrowness and its big tyre, and seems bigger than the front wheel? Notice too the transversal fastening that links the 2 frame tubes to hold the mudguard. A thin rubber layer is positionned between it and the fastening, even if this fastening is perfectly parallel to the mudguard curve. Fiberglass needs to be fixed smoothly? 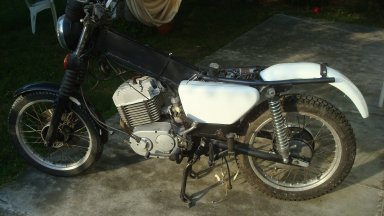
After days of puttying, sandpapering and finishing, the result is improving and one day, the execution is getting acceptable: 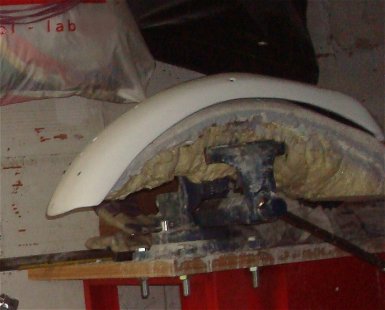
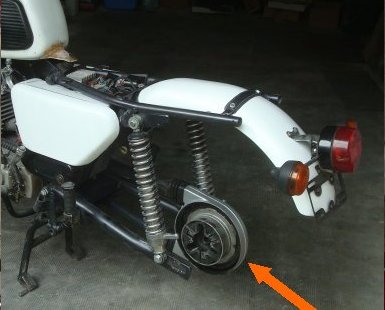
On the photo here above, you can see the chain covering which has been cleaned off, sandpapered then metal-coated, and the bellows that have been removed. At last, there below, the definitive rear mudguard (except for the color) with the gorgeous 17' wheel, wider and smaller than the guenuine one (in 18�). Thanks to the polishing, the black coat has vanished, and flange and break control now give to the back side a sort of panache: Even on the chain housing side, this one became light grey metal-coated, the back has lost its austerity and wears a pretty friendly look. An crucial detail: the stop and blinkers lights set from the 125 TS replaces favourably the guenine set. 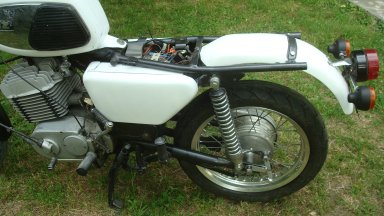

THE SEAT As the top cylinder or the exhaust, or furthermore the tank, some motorbike's organs are capable of obscuring all the rest and determine single-handedly the attractiveness or, to the contrary, the vileness that you can feel from the whole... The seat doesn't derogate from this rule and it is obvious that with the guenuine seat, the 250 ETZ look is clearly inhibitated. As I see it, a seat has 2 purposes: 1) to get beautiful in integrating the motorcycle's lines (generally, ending the curves of the tank and introducing the bend of the rear wheel and mudguard set), 2) to get comfortable, in enabling to lower as much as possible the rider's position like the trial motorbike's one, so pleasant to ride... I consequently kept the 2 levels seat that I made from the 125 TS seat. It remains to fit it to the different fastenings and to the prominence of the tank fastening lug. On the photo below, the base of the seat is positionned as low as possible, close to the frame tubes, while the front part is cut in order to get the necessary space requested by the tank fastening lug: 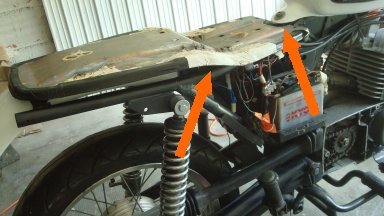
From below with the new shortened fastening that fit the 250 frame, you can see the 2 rubber abutments of which it is necessary to reduce the height by 80%, and the fastening flaps for the imitation leather that have been weld to substitute the broken ones. You can see the covering on the seat base edge with adhesive tape to avoid scaring the brand new imitation leather renewed from a saddler, and, on the next picture, the final result with a seat curve still too straight but that would shrink with use: 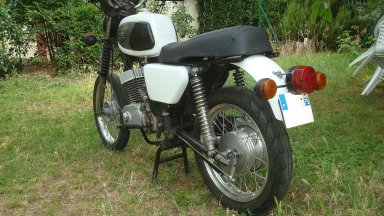
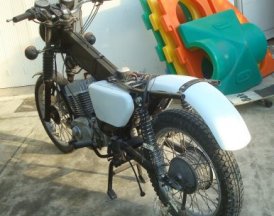
THE FRONT WHEEL, THE FORK, THE HEADLAMP AND THE HANDLEBAR (it sounds like a western title) The front wheel doesn't look like the rear one. The MZ designers thought that painting in black their hub was enough to get them similar. But this black coat, it gets quickly dingy. And why hiding the aluminium, the most beautiful metal ever, that sparkles with a so white and milky glitter?... The rear wheel has been sandblasted and got lustrous, the front wheel will be too. With its disk obviously. Concerning the disk itself, it requires to clean off the no braking part, to polish its steel, and to... varnish it. The same for the brake caliper, intially kaki coated (nostalgia? The question is asked...). With brand new spokes, and a polished rim, the result is a little bit more invigorating, isn't? 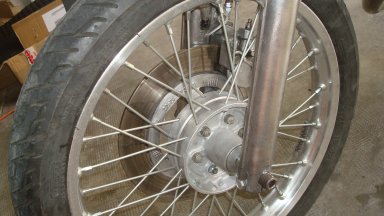
The fork too, deserves a rectification. How a Ceriani model fork could have been disguised with matt black tubes and bellows that conceals it? Was it so necessary to hide it so much? Whoever refuses the Ceriani style forks should deserve to pass beneath Caudine forks! Not only the bellows have to be get rid off, but the coat on the top fork T has to be removed in order to release the so beautiful aluminium (including the clocks support), and the bottom T has to get clear grey metal-coated to make it similar... 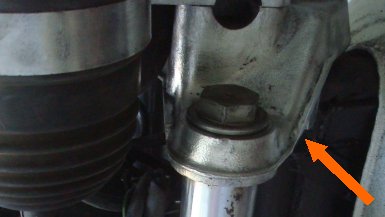
It is without any shame that I fire the guenuine headlamp too and replace it with a spare one (made in Japan) that enables to mount the blinkers in each side like the 125 TS ones. It obviously requires to shorten the tubes that support the headlight because the gap between the 2 fork T is shorter than on the 125 (that means the translation is longer as the external dimensions are identical?). Now, the front part takes a turn for the better. On the photo below, the detail of electric wires that required to be adapted to the new headlamp, hours of work... 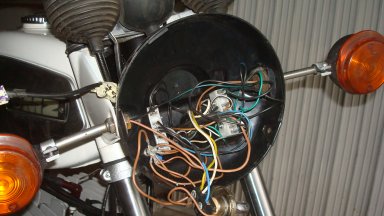
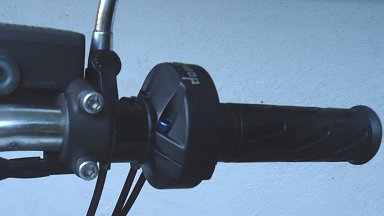
And this handlebar, like a rawing bike with handles that are almost parallel to the motorcycle axis (I am barely exagerating). It requires to be straightened out without delay in order it looks like a trial handlebar that is well in hand and that gives a more contemporary riding position... Here below the handlebar in its torture instrument (a vice with wooden covered jaws) after heating... Then, once mounted with the inevitable quick turn throttle control. 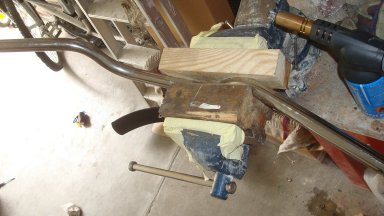
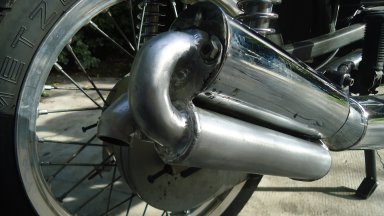
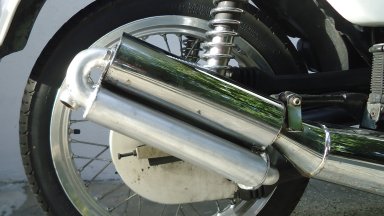
THE EXHAUST AND SILENCER The long guenuine exhaust, that never ends so it is draging out beyond the rear wheel, is so big and horizontal that it bans any esthetic miracle on the right side of the bike. The exhaust, it is a little bit like the top cylinder: either you can remove it, or you prefer to set your's heart on a more promising motorbike... Luckily, some MZ spare parts dealerships provide short expansion chamber exhausts with a top back. The result is quite great even if it is not as much gorgeous as an enduro style exhaust with a curved pipe above the gear box (see further). There is only one snag with this exhaust, it is noisy... Due to the fact it is separated into 2 parts with an silencer termination (the first part is perfectly empty, a very expansion chamber exhaust with its 2 cones!), it is theoretically possible to add some deflectors in it or to improve it : I replaced it by a pipe with a double elbow consequently twice longer than the delivered one with the exhaust, and with a reduced diameter, obviously packaged into glass wool, but the engine lost power. So, I went back the the guenuine solution then I added an external silencer based on the same principle (no frontal baffle against the gaz flow! Only lateral absorption...) aluminium made that enables to reduce the noise level. At last, I succeed in making a double elbow pipe copper made (still twice longer than the delivered one with the exhaust) with a bigger and uninterrupted diameter (30mm) and no absorption holes in the elbows in order to prevent any power loss. I puttied then polished inside the curves, fitted the connections, for an as fast as possible gaz flow... With this external silencer, the noise falls down significantly, and miraculously, the engine keeps its full power! Here below the new silencer that added to the external silencer enables to get almost the guenuine exhaust sound level. 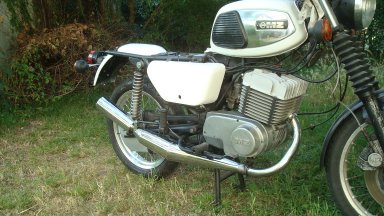
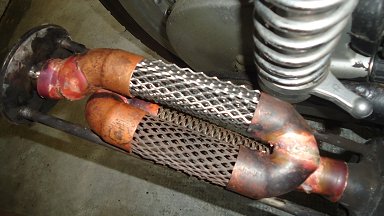
Given the 250 ETZ is particularly silent, it would have been shamefull to damage too much such a priceless benefit. Finally, beyond its rewarding esthetic, this exhaust provides another benefit: it weights 5 to 10 kilos less than the guenuine one! In the end, despite the frame reinforcement, the motorbike get lighter than initially... 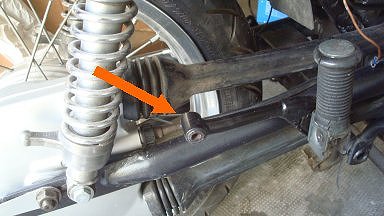
The exhaust is as much beautiful as the guenuine fastening lug is removed (otherwise, given that the new exhaust is shorter, the lug can't get parallel to the shock absorber and it get ugly). Here above, the fastening lug modified from the guenuine one, but it is fastened at the back of the rear footrest. And the definitive additionnal silencer. 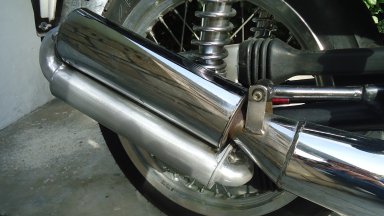
Then, here below, the enduro style exhaust pipe mock-up that will enable a torque increase thanks to the bend lengthening, and a better ground clearance, in addition to a pleasant look... TO BE CONTINUED ! 
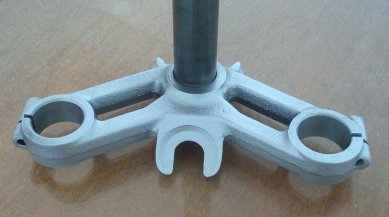
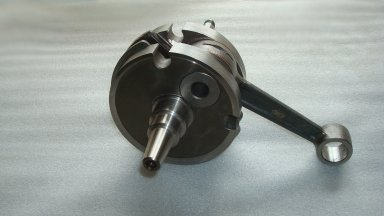
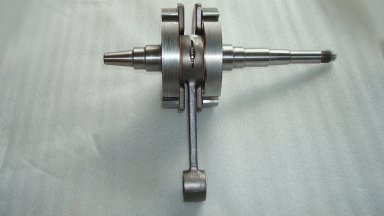
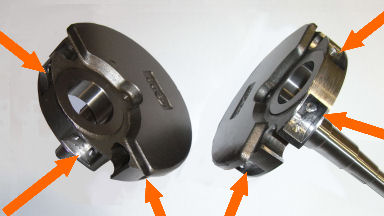
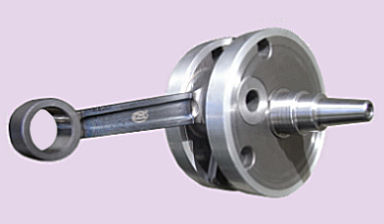
THE LIGHTENING OF CRANKSHAFT, CLUTCH AND DRIVE GEAR How not to evoke the mecanichal domain with the inascapable lightening of the enormous crankshaft... In the photos here below, the guenuine crankshaft (a brand new one), then once lightened on its periphery (-530 g on the circumference) then after milling lightening cavities every 60? on each flange (-140g)(why every 60?? In order not to unbalance the crankshaft while keeping enough metal around the rod axle). After that, every crankshaft flange is covered by an aluminium ring (3 times less heavy than the steel) of which the weight is expected not to exceed 180g. These 2 rings are press fitted on the flanges to give them back the initial volume without which the crankcase compression would be no more than a painfull remenbrance! At the end, with the press fitted aluminium on the crankshaft (last photo here below), it only weighs 4,169kg, that means a global lightening of 496g before balancing. About the balancing itself, the specialist statement is quite positive: the crankshaft is more balanced than the guenuine one, but it should be achieved in substracting 96g on the head of the rod in order to perfectly offset the piston weight. Unless mounting a lighter piston, option that I finally choosed because there is no more remaining metal to be removed from the crankshaft!... 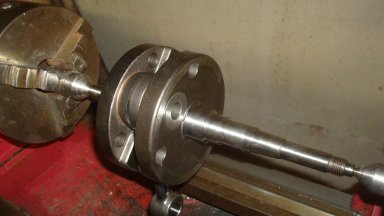
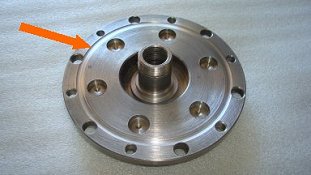
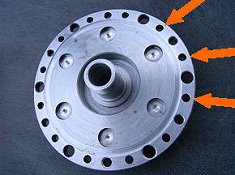
The clutch is very heavy too, gruesomely heavy (moreover it turns at the same speed as the crankshaft)... and its lightening is not that easy. The clutch body has been ploughed by several milimeters on its circumference and on one of its sides, then drilled with 12 naughty holes on its external part that enables the lightening to reach -57g. As far as I have found out an aluminium body clutch from the guenuine MZ enduro version. This body clutch is exactly the copy of the initial one, but "hard" aluminium made with a 640g weight reduction (photo here below)! Impossible to refuse! Concerning the supporting disk, it has been chamfered, and its diameter has been recentred (-10 g) while the pressure plate is turned on its front part between the spring housings (-5g) and drilled on its outline via 12 additionnal holes between the tightening screws (-16g) for a global reduction of -21g. Sum-total, there are 667g gained, (and not 88g as with the turned and drilled guenuine clutch body), that weren't usefull for the global strength, and that are fitting so well the waste bean... 
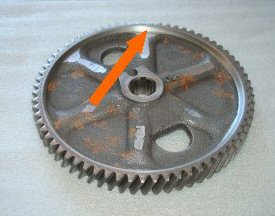
To this stuff, it is necessary to add some modifications on the drive primary gear, that certainly revolves 2,43 times slower than the engine, but that is neither light nor with a little diameter... Moreover, initially, the teeth machining is so off-centre from the cast-iron moulding that the only fact of machining the internal circumference improves clearly the drive gear balance (-20 g). 
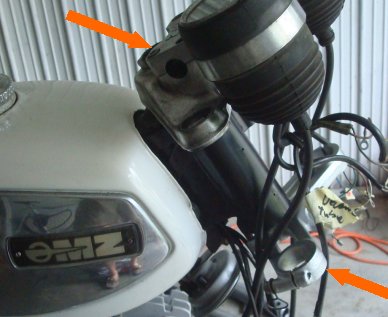
Consequently, sum-total, if we add up all the gains from the crankshaft, the clutch and the drive gear, we obtain a decrease of 1 183 g (1,18 kilos), and that only from external parts (the farthest from the rotation axis). It is merely gargantuan. Without forgetting that it is not unlikely I gain additionnal 20g on the electronic ignition rotor... ELECTRONIC IGNITION AND PROGRAMMABLE IGNITION Electronic ignition deserves praise because, beyond best moving off, a more consistent and silent running in stabilized pace, and a slightly power bonus at high speed, it enables to save a big space under the seat and into the toolkit housing. Currently, this one can contain bike clothes and a tyreweld spray. Moreover, with its new dimension, the toolkit housing has gained some centimeters length. Even the ignition housing got quite empty now (on the left side, the guenuine ignition), with the little electronic ignition set! 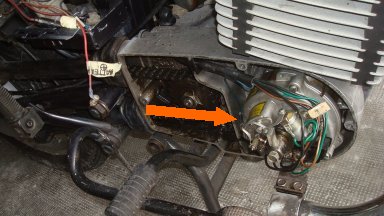
Having say that, it has to be recognized that replacing the guenuine ignition by an electronic one is not that easy at all? On the instructions booklet, explanations are neither always clear, not in french/english (the kit comes from Germany) and you consequently need to understand all the circuit diagram and to get proficient in the ignition domain. Only one advice: to hire your neighbour that is an expert. Choose him with an engineer diploma and a very strong experience. For helping you in your research, see below the photo of the mine one. I advice you exactly the same. 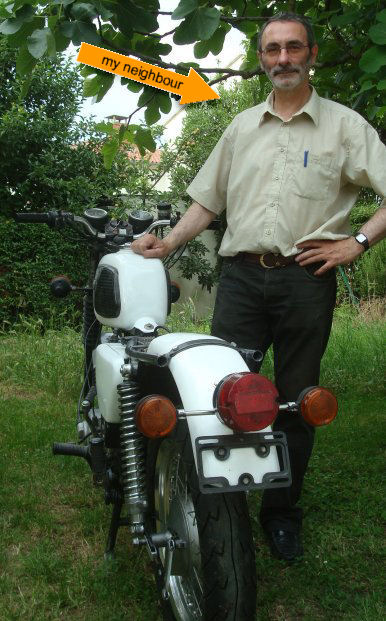
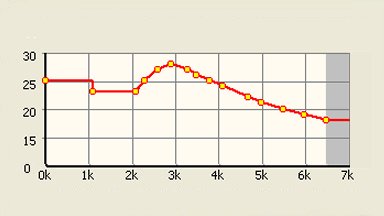
Choose him fitted with a strobe lamp and spurred on by perfectionnism. Thereby, he will pricesely set the firing point in converting the crankshaft revolution degrees (or the piston stroke before the top dead center) into milimeters on the ignition rotor. A mark on the housing engine symbolizes the TDC, a mark on the ignition flange symbolizes the firing point plus the advance converted into milimeters on the rotor. All this staff has to match from the strobe lamp... Then, in order to optimize the advance according to the engine speed (too much advance at every engine rotation speed jeopardizes the engine), a programmable Ignitech ignition system has been implemented by DEVMoto. You can see on the pictures here below the new ignition system installed in parallel to the previous system with its new stator, and the advance curve optimized thanks to successive trials... 28? advance at 2900 rpm then 26? at 3500 rpm, it tenfolds the torque! To the contrary, decreasing the advance below the guenuine 22? since 4800 rpm frees the engine up. 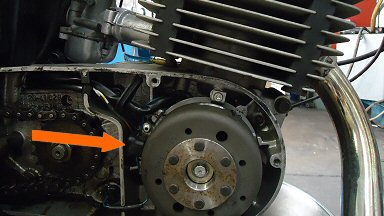
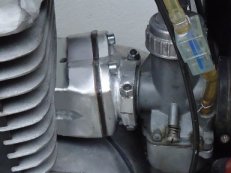
CARBURETION, AIR FILTER, INTAKE REED AND EXHAUST PORT The engine didn't breath enough with the guenuine set up. The carburetter's needle has been lowered at the maximum while the top of the air filter cup has been drilled on the corner nearby the air entrance within the frame. But the engine was still hiccuping between 4900 rpm and 5400 rpm up to I cut the air filter cup on 3 sides and I put a high-flow air filter K&N (BMW 1150 type of which it is necessary to widen a little bit the air entrance). In order to keep the induction noise at a normal level, after having modify the guenuine cup and add fiber glass deflectors, I designed a cup from scratch, aluminium made, that I drilled and to which I added a long pipe in fiber glass ending by a rubber tube (in fact, half from the guenuine one that is inserted within the frame). And then, the noise is very soft while enabling a huge air flow! 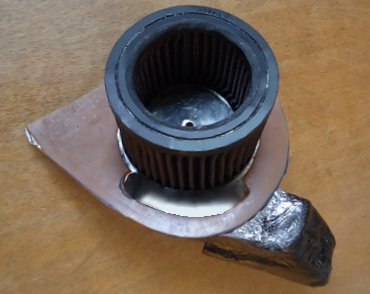
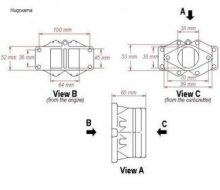
For the intake pipe, after long research on internet and from German and American providers, the advices from an old-timer bike restorer I know prove true: the Husqvarna 250 bikes from 1982/1983 were the only to get a pipe with a reed that doesn't need a box inside the cylinder basis. In addition, the port dimensions on the engine side are almost similar as the MZ intake pipe so that the adaptation seems perfectly possible. Drawings and a wood model have been realized in order to check the feasability of these adaptations. Here belows, the guenuine intake pipe and the double reed box from Huqsvarna. 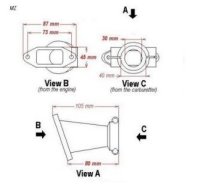
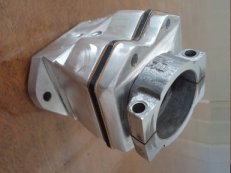
The 3 first pictures here below show the parts that are built up in order to fit the double reed box on the cylinder port, just before to be weld. With such a reed box, the consumption is expected to decrease thanks to the gaz pushback elimination, and the torque should improve as much. On the fourth picture, the mounted box, with disappointing results after trails ecause the engine has to be prepared to abide such a system, in shortening the piston skirt on the induction side, and even in drilling a hole in the piston in front of an additionnal induction transfer. But are these modifications compatible with more torque ? I don't think so! 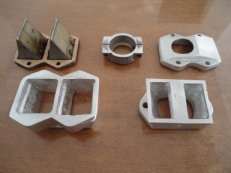

Concerning the exhaust port reducing (according to the fact that a reed box is probably not the best solution), on the contrary, it must increase the torque. I am very interested to see how much it is true, and what are the consequences on the top speed, according to the fact I am targeting more accelerations and a lower consumption, rather than power at high engine speed (all the details in PHASE 2). PERFORMANCES AND DESIGN: THE RESULT SO FAR The motorbike has been remounted with the new lightened crankshaft, the alloy and lightened clutch, the lightened drive gear, brand new bearings, programmable ignition, optimized intake pipe, intake and exhaust silencers... The motorbike has run a lot, the break-in period is over and the accelerations are atonishing, the bike can reach very quickly 6500 rpm in 5th gear (81,25 mph/130 kmh chrono, and exeeds slightly this speed) that proves it could be faster with a less demultiplicated gear box, and accelerates frankly from 3000 rpm... Next step: the results with the new 290cc engine and its optimized ports and transfers (without any reed box). SEE THE NEXT EPISODE ON "PHASE 2"! |
|
| Ducati SCR restoration 250 G-P STR 350 ItalScrambler Triumph BNV PUCH SGS MZ 125 TS BMW R26 Custom Scooter STR |